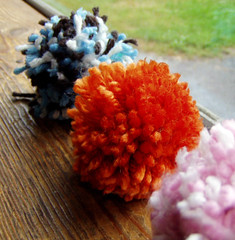
In preparation for my second elementary fiber fun class, Ally and I have been making pom poms. I experimented with several ways of making a pom without a store bought tool. In the end, using just your fingers is the easiest. For Method II: Using a Handmade tool click here. My favorite part is trimming and shaping the pom pom. It can be a bit addictive and very messy, so don't make a pom pom over the carpet - the kitchen floor is definitely easier to clean up. I think we may try making a pom pom rug, pillow, or scarf.
 Monsieur Pom
Method I - Just your fingers
Step I - The Wrap
Wrap the yarn 75 - 100 times around two to four fingers. The more you wrap the denser it will be. The more fingers you use the larger it will be. Fasten off.
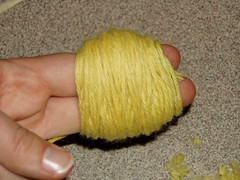
You can make a multi colored pom by holding strands of two or more colors together when wrapping. When using bulky or multiple stranded yarns you don't have to wrap as many times. Just make it thick.
Step II - Tying it off
Cut a separate length of yarn about 10" long. Push one end, of the short yarn, between the fingers closest to the hand, bring it around the back of the wrapped yarn and between the fingers closest to the tips of the fingers. Tie the two ends together over the middle of the bundled yarn and knot it as tight as you can. Remove the bundle from your fingers.

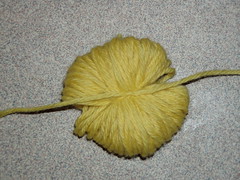
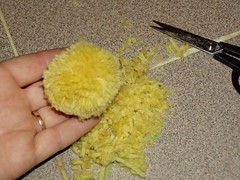
Step III - Cut the loops
Without cutting the center knot, cut through the loops at both ends.
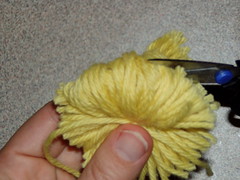
A sharp pair of scissors is your friend.
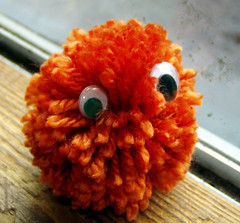
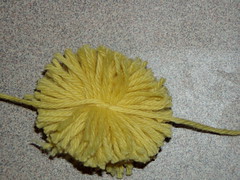
Step IV - Shape, Trim, Fluff, and Trim
Spread the threads out from the center and squish it flat like a pancake, with the knotted thread on the inside of the bundle.
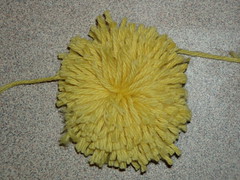
Begin trimming and shaping into a circle. You're giving your pom pom a new "do". Keep rotating the pom, squishing it flat and trimming around to shape it into a circle.
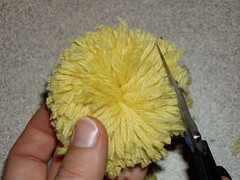
As it gets more dense and starts to resemble a 3-dimensional pom pom, give it a fluff and a trim the ends that are sticking out. Repeat fluffing and trimming to desired shape.
Le Pom
19 comments:
You are brilliant. Great pompoms w/o a tool. I will have to try this.
Yep, that's smart--I'll have to try that also!
GinaRenay
AWE!Some Crochet
Hi
If you hold your finished pom (by the thread tied round the middle!) over a steaming kettle of water, it will puff up even more nicely!
Shirley
I had no idea about that, Shirley. Thanks for the tip!
I have the tool, but I think I will like this method better. Thanks for sharing it.
I'll have to try the steaming, too.
JoAnn
Do you tie a square knot? What is the secret to tieing a tight knot? My first knot always loosens up a little before the second one is tied on top of it, so the strands come out in the wash. :-(
Thanks for your comments.
Linda
I do tie a square knot. I just place one finger on top of the first tie (or get a little friend to help) then make the second tie. Then, I do a third for good measure.
Wow! This is a really fun way to make it and also the other way! I've made 5 pompoms!!! Thank you so much!!!!!
Did you know if you wrap your pompom in saran wrap and let it sit for a few hours, when you take it out of the saran wrap your yarn will be curly to add some creativity!
Hope this works for you:)
-Deborah
Thank you I am about to make a fluffy tail for an Easter Rabbit(he's late you know what they're like)perfect for me I hate those donuts of cardboard.
You are very generous and clever. I just ordered your book from Amazon, even if I live in Paris, France. Thank you for everything you give us.
Thank you! I just made the best pom pom ever with only my finger. I HATE using tools!
I could totally have done with knowing about this last week. Had to make tonnes of pompoms on the fly!
Still, I have a suggestion for ensuring a tight knot. Do a slip knot and once the yarn is off your fingers give it a good, firm pull to tighten further. Then, pull the other strand of yarn. This last pull will change the knot from a slip- into a reef-knot (US Square knot, I suspect)
Great tutorial!
What is the key to tieing a restricted knot? My first troubles always releases up a little before the second one is linked on top of it, so the lengths come out in the rinse.
If you carry your completed pom by the place linked throughout the middle! over a broiling pot of water, it will smoke up even more nicely!
Did you know if you place your pompom in saran place and let it sit for a few time, when you take it out of the saran place your string will be ugly to add some creativity! Hope this operates for you.
If you hold your finished pom (by the thread tied round the middle!) over a steaming kettle of water, it will puff up even more nicely!
I finally, know how to make a pompom! One i just made, ill hang! Thank, thank u!!
Post a Comment