Here's the pattern:
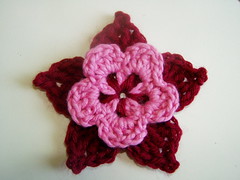
Picot Flower
Yarn: a few yards each of worsted weight yarn in two colors, color (A): smaller center layer of flower, color (B): larger picot layer of flower
Hook: Size H/8 (5.0 mm)
Yarn needle for weaving in ends
US Stitch Guide:ch - chain
sl st - slip stitch
sc - single crochet
dc - double crochet
hdc - half double crochet
tr - treble crochet
picot - chain 3, slip stitch to first chain
With (A), ch 4, join with sl st to first ch to form a ring
Rnd 1: Ch 1, sc in ring, * ch 3, sc in ring*, repeat * to* around 3 more times, ch 3, sl st to first sc to join (5 ch-3 loops).
Rnd 2 (petal round): * (Sc, ch 1, 3 dc, ch 1, sc) in each ch-3 space around, sl st to first sc to join. Fasten off (A).
Rnd 3: Push one of the petals forward, so that you can work behind the petals, with (B) insert hook through ch-3 space from Rnd 1 and out through the foundation ring, yo, draw up a loop, ch 1, sc in same space, * ch 4, sc into ring through ch-3 sp of next petal *, rep * to* around 3 more times, ch 4, sl st to first sc to join (5 ch-4 loops).
Rnd 4 (petal round): * (Sc, hdc, dc, 2 tr, picot, 2 tr, dc, hdc, sc) in each ch-4 space around, sl st to first sc to join. Fasten off (B). Weave in ends.
48 comments:
It's a beautiful flower and I'll certainly give it a try when I have a bit of time. Of course I'll let you know how it turned out.
Thanks for explaining it.
I'm making it right now, Just finished rnd 3 w/ no problems! Makes sense to me.Thanks for sharing such a cool flower pattern!-Yelutci/Kimberly
i have just finished making it,in 2 different shades of green.The directions are fine & i had no problem following them.I am turning it into a pin; thank you for creating the pattern...blizzard53/cp'er
It worked out GREAT...I love it.
No problem with the pattern at all. It was easy to understand.
Susie
Thank you for sharing!
Am so glad someone else is into flowers as much as me. Thanks for your time & energy, sharing this with us.
Chain on, Skamama! You rock!
I've been looking for the perfect pattern to finish a beanie, and I think this may be it! It kinda looks like a Columbine! I'll let you know how it turns out. :D
Julie, you are a genius!!!Thanks for sharing.I love pom poms, so I'll give a try.
I love this flower and so does my five year old. I crocheted them and put a button in the center and a rubber band on the back. My daughter has very long hair and often wears pony tails. There are pictures on my blog of them.
Thanks so much for posting the pattern. It is really lovely.
Sam
www.compassionknits.blogspot.com
This is beautiful. I want to attach it to a necklace. Thanks! The directions were really well written.
Great pattern, thanks! The instructions were very clear and I love the contrasting petal shapes.
I love this pattern! I had no problems w/ it and made two to go on both of my daughter's hats. You can see them on my blog.
http://pam-friedfamilylife.blogspot.com
I love this flower, I've just finished my first one (and there will be many more!) and it looks absolutely gorgeous. I used light blue and dark blue/purple in cashmerino aran. It's going to be a Christmas present for one of my friends.
This is adorable! Super easy! Thanks so much for sharing!
Hi, I'm an absolute beginner at crochet and I have a bit of difficulty understanding what you mean with "ch-3 space". A chain minus 3... space? Idem with the "ch-4 space". Please help me? tilia.linden @ gmail . com
Hello Tilia. It would be the space that was created when you made 3 chains on the previous round. On the first round you made 3 chains then connected them to the base with a single crochet forming a space. When you come to the space on the next round work all of the stitches within the parentheses for each space.
Thank you for this wonderful flower!!
I used it to create a beautiful winter wrap around shawl for my grandmother.
I have posted pictures and the pattern for my shawl. I included a link to your page for the flowers!
http://hltcrafts.blogspot.com/2009/05/mothers-day-flowered-shawl-including.html
Again, Thank you so much for the pattern, it worked wonders!
Heather
hltcrafts
This flower is lovely! Thanks for sharing. I actually just discovered you're the designer of the Fat Bottom Bag from Stitch'n Bitch. Funny, i needed this flower to use it for another bag from the book :)
I've been hunting for the perfect flower to accent my amigurumi bunny and after filling my room with flowers that didn't quite look right my bunny is now adorned with this beautiful creation. Thank you so much!
Love this pattern. It felts BEAUTIFULLY and makes a perfect accent!
Thank you so much for the pattern, it's very easy and clear and the result is just beautiful!!!!
This is the best flower ever!! Thanks
It's a beautiful tutorial! I will link in a future blog post.
this is such a gorgeous flower pattern HAD to try for myself!
Thank you o much for this gorgeous flower!
I absolutely love this flower! Thank you for the instructions!!!
I used this flower to cover up my poor sewing skills on a bag handle. Thanks very much for posting it!
Thanks so much for sharing this!
I have used it on two hats (slightly modified) and just came looking for it again for a new one :)
http://growingfree.wordpress.com/2009/08/30/new-tawashi-in-progress-and-a-hat/
http://growingfree.wordpress.com/2009/08/30/same-style-hat-different-size-and-color/
Thank you for the pattern!!!
Here is my result.
http://virkaholic.blogspot.com/2010/06/blommor.html
Hmm. I've made several flowers following other patterns, yet this one is stumping me.
Can you please explain round 1 to me a little more? I Chained 1, single crochet in ring, chained 3, single crocheted in ring (three times)...and then I get lost. I tried chaining 3, then slip stitching to first single crochet, but that type of joining doen'st look round at all, and it isn't matching the picture.
What am I doing wrong? I think it's the "repeat *to* around 3 more times" that is throwing me, plus I am confused by the "(5 ch-3 loops)."
Thank you! I really want to make some of these for barrettes for my daughter.
Can you please clarify Round i directions. I have made other flower patterns, but this one is stumping me a bit.
This is what I did: made a ring, Chained 1, single crocheted in ring, chained 3, single crocheted in ring, repeat chain 3 and single crochet into ring 3 more times, then chained 3 and slip stitched into the first single crochet to join.
It isn't round at all, and looks (space wise) that it needs another loop.
I also don't know what the (5 chain-3 loops) means.
Thank you! I really want to make this work. it's adorable.
Hi Wnderlnd. After you did the "ch 3, sc" into ring round you end up with five chain-3 spaces (or loops). When I put (5 chain-3 loops) at the end, I put it there to let the reader know how many stitches or spaces they should have at the end of a row or round.
So, there should be 5 chain spaces which will end up making 5 petals. If you want more petals, you can repeat the "ch 3, sc" again. There should be one chain-3 space per petal.
many many thanks for the pattern! so happy about my result :) best regards from austria/europe!
Absolutely love this flower! Thank you so much for posting this pattern!!!It's a wonderful addition to plain colored hats....creating a few for each hat so friends can switch them out!!
Absolutely love this flower! It was just what I was looking for as a finishing touch on a hat I knit. Easy and elegant! Many thanks for posting!!
it's so cute.
I've been searching the internet & pattern books for cute flowers I can make into baby hair clips with thread. This one couldn't get any cuter. At each stage, I am thinking wow this would be super cute just like this! Easy instructions too. You've definitely designed a wonderful flower, I will be making more of!
Thanks for sharing your beautiful flower. I am featuring it on Day 2 of my June Blooms series. If you want to check it out visit my blot at http://www.SunflowersatHome.blogspot.com
Thank you for sharing this pattern!
Groetjes Jannie
This is such a great flower pattern! Very unique, & easy to follow. Thanks so much for sharing! :)
Hello. I am new to crochet and I don't really understand reading directions for this at all! I've done round one and it looks like I have one of the petals for the small flower in the middle but I'm stumped what to do next. I really don't understand if I repeat what I just did or start a new process. Thanks!
Just made this flower to finish my daughters Rupunzel hat... it reminded me a lot of the flower from the movie Tangled... thank you so much!!!
love this flower pattern. used it to enhance my toddler dress, u can check it on my blog !!!!!!!
Beautiful flower, easy pattern. Thanks so much for sharing!
Hi hun. Just wanted to let you know that I featured this on my blog today. I would love it if you could go and check it out :)
http://mammymade.blogspot.co.uk/2013/01/mint-stuff-ive-seen-29.html
- Adele @ Mammy Made
Thank you so much for sharing this pattern! I used it to decorate a spring wreath, turned out very nice :)
This is exactly what I need to finish off a baby beanie! Thanks so much for sharing :o)
Thanks so much for posting this pattern. I am making these as gifts for all my nieces.
E' bellissimo questo fiore e tutti i tuoi lavori !
Post a Comment